目录
[TOC]
一、快速入门
一个最简单的依赖注入例子:
-
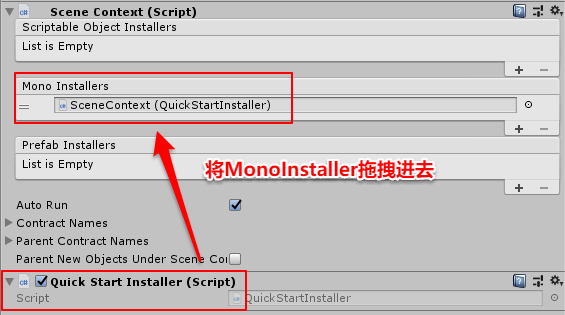
Step1:在Hierarchy中通过”鼠标右键–Zenject–Scene Context“创建SceneContext场景上下文。
-
Step2:通过”鼠标右键–Zenject–Mono Installer“创建Mono Installer并命名为QuickStartInstaller。
-
Step3:在SceneContext上挂载QuickStartInstaller脚本,并在Scene Context组件中添加Mono Installer,然后将自身拖拽进去。如下图所示:
-
Step4:在场景中创建空物体HelloWorldExample,并创建同名脚本并拖拽至该物体上。
-
Step5:编写脚本:
    public class QuickStartInstaller : MonoInstaller
    {
        public override void InstallBindings()
        {
            //使用容器Container绑定BluetoothService
            //并使其作为单例
            Container.Bind<BluetoothService>()
                .AsSingle();
        }
        public class BluetoothService
        {
            public void Connect()
            {
                Debug.Log("Examples--1.QuickStart--" + "蓝牙连接成功");
            }
        }
    }
      public class HelloWorldExample : MonoBehaviour
      {
          //注入
          [Inject] private QuickStartInstaller.BluetoothService mBluetoothService;
          private void Start()
          {
              mBluetoothService.Connect();
          }
      }
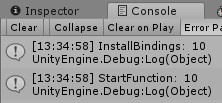
CTRL+SHIFT+R运行后,控制台打印输出:Examples--1.QuickStart--蓝牙连接成功
二、基本使用
1.依赖注入
依赖注入:给当前脚本提供所需对象的实例,所需要的对象的实例需要通过[Inject]属性进行标记。
提供这些对象的操作,叫做注入操作。
Zenject的注入模式有4种:
- Constructor Injection:构造函数注入
- Field Injection:成员变量(域)注入
- Property Injection:属性器注入
- Method Injection:方法注入
(1)Constructor Injection(构造函数注入)
- 解释:通过构造方法传递实例
- 工作原理:根据构造方法的参数类型自动申请实例。(参数可以有多个)
步骤Step1~4与快速入门中的类似,仅修改相关名称。
Step5:编写脚本:
    public class ConstructorInjectionInstaller : MonoInstaller
    {
        public override void InstallBindings()
        {
            Container.Bind<BluetoothService>()
                .AsSingle();
        }
        public class BluetoothService
        {
            public void Connect()
            {
                Debug.Log("Examples--2.ConstructorInjection构造函数注入--" + "蓝牙连接成功");
            }
        }
    }
注意:
- MonoBehaviour的对象创建过程由Unity引擎决定,所以无法在脚本的构造函数中进行依赖注入,而是使用名为Constructor的函数进行构造函数注入。
- Constructor函数上需要进行Inject Attribute注入属性标记:
[Inject]。 - 函数名称不一定为Constructor,在脚本中,构造函数注入本质上是Method Inject(方法注入)。
    public class ConstructorInjectionExample : MonoBehaviour
    {
        private ConstructorInjectionInstaller.BluetoothService mBluetoothService;
        //构造函数注入
        [Inject]
        void Constructor(ConstructorInjectionInstaller.BluetoothService bluetoothService)
        {
            mBluetoothService = bluetoothService;
        }
        private void Start()
        {
            mBluetoothService.Connect();
        }
    }
运行后控制台打印输出:Examples--2.ConstructorInjection构造函数注入--蓝牙连接成功。
(2)Field Injection(成员变量(域)注入)
    public class FieldInjectionInstaller : MonoInstaller
    {
        public override void InstallBindings()
        {
            Container.Bind<BluetoothService>()
                .AsSingle();
        }
        public class BluetoothService
        {
            public void Connect()
            {
                Debug.Log("Examples--3.FieldInjection成员变量(域)注入--" + "蓝牙连接成功");
            }
        }
    }
原理:遍历通过Inject Attribute标记的成员变量,进行赋值。
    public class FieldInjectionExample : MonoBehaviour
    {
        //成员变量(域)注入
        [Inject] private FieldInjectionInstaller.BluetoothService mBluetoothService;
        private void Start()
        {
            mBluetoothService.Connect();
        }
    }
运行后控制台打印输出:Examples--3.FieldInjection成员变量(域)注入--蓝牙连接成功。
(3)PropertyInjection(属性器注入)
    public class PropertyInjectionInstaller : MonoInstaller
    {
        public override void InstallBindings()
        {
            Container.Bind<ResLoader>()
                .AsSingle();
        }
        public class ResLoader
        {
            public T Load<T>(string name) where T : Object
            {
                Debug.Log("Examples--4.PropertyInjection属性器注入--" + typeof(T) + name);
                return default(T);
            }
        }
    }
原理:遍历通过Inject Attribute标记的属性器,调用SetProperty方法进行赋值。
    public class PropertyInjectionExample : MonoBehaviour
    {
        //属性器注入
        [Inject]
        public PropertyInjectionInstaller.ResLoader ResLoader { get; private set; }
        private void Start()
        {
            ResLoader.Load<GameObject>("TestGO");
        }
    }
运行后控制台打印输出:Examples--4.PropertyInjection属性器注入--UnityEngine.GameObjectTestGO。
(4)Method Injection(方法注入)
    public class MethodInjectionInstaller : MonoInstaller
    {
        public override void InstallBindings()
        {
            Container.Bind<ResLoader>()
                .AsSingle();
        }
    }
    public class ResLoader
    {
        public T Load<T>(string name) where T : Object
        {
            Debug.Log("Examples--5.MethodInjection方法注入--" + typeof(T) + name);
            return default(T);
        }
    }
原理:遍历标记Inject Attribute的方法,并遍历方法中的参数,为参数设置实例。(MonoBehaviour中的构造函数注入其实用的就是方法注入)
    public class MethodInjectionExample : MonoBehaviour
    {
        private ResLoader mResLoader1;
        private ResLoader mResLoader2;
        //方法注入
        [Inject]
        private void Method(ResLoader resLoader1, ResLoader resLoader2)
        {
            mResLoader1 = resLoader1;
            mResLoader2 = resLoader2;
        }
        private void Start()
        {
            mResLoader1.Load<GameObject>("1号");
            mResLoader1.Load<GameObject>("2号");
            Debug.Log(mResLoader1.GetHashCode());
            Debug.Log(mResLoader2.GetHashCode());
        }
    }
运行后控制台打印输出:Examples--5.MethodInjection方法注入--UnityEngine.GameObject1号;
Examples--5.MethodInjection方法注入--UnityEngine.GameObject2号;
-630497024;-630497024。因为ResLoader是单例,所以其HashCode相同。
(5)依赖注入总结
-
Zenject中依赖注入模式:(4种)
Constructor Injection构造函数注入:在MonoBehaviour中本质上就是方法注入
Filed Injection成员变量(域)注入
Property Injection属性器注入
Method Injection方法注入
-
推荐使用构造函数注入(.Net Core只支持构造函数注入)
2.绑定
绑定最核心的功能就是向Container注册类型。
相关概念:
- Container–容器
- Bind–绑定方法
- ResLoader–类型
(1)DiContainer的使用
DiContainer:Dependency Injection Container–依赖注入的容器。
DiContainer的职责:管理绑定,管理依赖关系。
包含三个API:
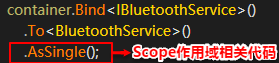
Bind<XXX>().To(YYY).AsZZZ():绑定。(AsZZZ()为Scope作用域)Resolve<XXX>():解析,作用是获取实例。Inject<XXX>():注入
(a)Resolve解析:在Container中寻找指定对象实例,若不存在则创建实例并返回。
    public class DiContainerExample : MonoBehaviour
    {
        private void Start()
        {
            //创建Container进行绑定操作
            var container = new DiContainer();
            container.Bind<ResLoader>()
                .AsSingle();
            //Resolve解析:
            //先在Container中寻找是否有ResLoader实例,如果没有就创建并返回。
            ResLoader resLoader = container.Resolve<ResLoader>();
            resLoader.Load<GameObject>("PrefabA");
        }
    }
(b)Inject注入:遍历当前类,将标记有Inject Attribute的通过Resolve获取实例。
    public class DiContainerInjectExample : MonoBehaviour
    {
        [Inject] private ResLoader mResLoader;
        private void Start()
        {
            var container = new DiContainer();
            container.Bind<ResLoader>()
                .AsSingle();
            //Inject包含两步操作:
            //1.遍历当前类
            //2.将标记有Inject Attribute的通过Resolve获取实例。
            //Resolve解析类型:查找实例并返回,若不存在则创建。
            container.Inject(this);
            mResLoader.Load<GameObject>("PrefabB");
        }
    }
(c)BindTo操作:约定类型与结果类型绑定
Bind<ContractType>().To<ResultType>():
- ContractType:约定类型(类型不限,一般用接口)
- ResultType:结果类型(Result is ContractType)
- 根据约定类型解析出结果类型。
一个约定类型绑定一个结果类型:
    public class BindToExample : MonoBehaviour
    {
        private void Start()
        {
            var container = new DiContainer();
            //将约定类型与结果类型进行绑定
            container.Bind<IBluetoothService>()
                .To<BluetoothService>()
                .AsSingle();
            //约定类型进行解析(查找),返回结果类型实例。
            var bluetoothService = container.Resolve<IBluetoothService>();
            bluetoothService.Connect();
        }
        interface IBluetoothService
        {
            void Connect();
        }
        public class BluetoothService : IBluetoothService
        {
            public void Connect()
            {
                Debug.Log("蓝牙连接成功");
            }
        }
    }
Bind(params Type[] contractTypes).To<ResultType>()
多个约定类型绑定一个结果类型:
    public class BindToExample2 : MonoBehaviour
    {
        private void Start()
        {
            var container = new DiContainer();
            container.Bind<IClassA>()
                .To<ClassA>()
                .AsTransient();
            container.Bind<ClassABase>()
                .To<ClassA>()
                .AsTransient();
            container.Bind<ClassA>()
                .To<ClassA>()
                .AsTransient();
            //绑定多个类型的简化方式:
            container.Bind(typeof(IClassA), typeof(ClassABase), typeof(ClassA))
                .To<ClassA>()
                .AsSingle();
            Debug.Log(container.Resolve<IClassA>().GetType());
            Debug.Log(container.Resolve<ClassABase>().GetType());
            Debug.Log(container.Resolve<ClassA>().GetType());
        }
        interface IClassA { }
        public abstract class ClassABase : IClassA { }
        public class ClassA : ClassABase { }
    }
(d)Scope作用域:AsSingle/AsTransient/AsCached
AsSingle:以单例形式存在
不论Container容器解析多少次都为同一个对象。
测试脚本:
    public class AsSingleExample : MonoBehaviour
    {
        private void Start()
        {
            var container = new DiContainer();
            container.Bind<ResLoader>()
                .AsSingle();
            //单例哈希值相同
            Debug.Log(container.Resolve<ResLoader>().GetHashCode());
            Debug.Log(container.Resolve<ResLoader>().GetHashCode());
        }
    }
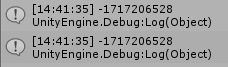
运行结果:(哈希值相同=>每次解析返回相同的对象)
AsTransient:每次解析时返回新的实例
Transient意为短暂的。
测试代码:
    public class AsTransientExample : MonoBehaviour
    {
        private void Start()
        {
            var container = new DiContainer();
            container.Bind<ResLoader>()
                .AsTransient();
            //Transient每次解析获取不同实例,哈希值不相同
            Debug.Log(container.Resolve<ResLoader>().GetHashCode());
            Debug.Log(container.Resolve<ResLoader>().GetHashCode());
        }
    }
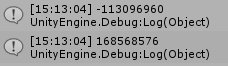
运行结果:(哈希值不同=>每次解析返回对象不同的实例)
AsCached:为每个约定类型创建一个单例
Cached意为缓存。
AsCached:约定类型第一次解析时,创建一个新的实例。约定类型再次进行解析时,返回首次解析时创建的实例。(为每个约定类型创建一个单例实例)
测试代码:
public class AsCachedExample : MonoBehaviour
{
private void Start()
{
var container = new DiContainer();
//AsCached:
//约定类型第一次解析时,创建一个新的实例
//约定类型再次进行解析时,返回首次解析时创建的实例
//为每个约定类型创建一个单例实例
container.Bind<IClassB>()
.To<ClassB>()
.AsCached();
container.Bind<ClassBBase>()
.To<ClassB>()
.AsCached();
container.Bind<ClassB>()
.To<ClassB>()
.AsCached();
//相同约定类型为一组
//每一组的哈希值相同
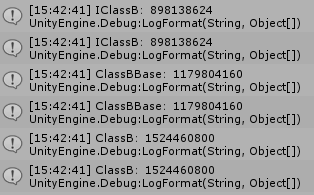
Debug.LogFormat("IClassB:{0}", container.Resolve<IClassB>().GetHashCode());
Debug.LogFormat("IClassB:{0}", container.Resolve<IClassB>().GetHashCode());
Debug.LogFormat("ClassBBase:{0}", container.Resolve<ClassBBase>().GetHashCode());
Debug.LogFormat("ClassBBase:{0}", container.Resolve<ClassBBase>().GetHashCode());
Debug.LogFormat("ClassB:{0}", container.Resolve<ClassB>().GetHashCode());
Debug.LogFormat("ClassB:{0}", container.Resolve<ClassB>().GetHashCode());
}
interface IClassB { }
abstract class ClassBBase : IClassB { }
class ClassB : ClassBBase { }
}
运行结果:(每一组的哈希值相同=>AsCached为每个约定类型创建一个单例)
Scope作用域代码总结
- AsSingle:以单例形式存在,不论解析多少次都为同一个对象。
- AsTransient:每次解析时返回新的实例。
- AsCached:约定类型第一次解析时,创建一个新的实例。约定类型再次进行解析时,返回首次解析时创建的实例。(为每个约定类型创建一个单例实例)。
(e)自动绑定接口
自动绑定接口BindInterfacesTo<ClassC>()
将目标类型ClassC所有的接口作为约定类型与ClassC进行绑定
注意:只能是接口,抽象类和普通类均不行。
测试代码:
    public class BindInterfacesToExample : MonoBehaviour
    {
        private void Start()
        {
            var container = new DiContainer();
            //自动将ClassC所有接口与ClassC进行绑定
            container.BindInterfacesTo<ClassC>()
                .AsSingle();
            Debug.LogFormat("IInterfaceA:{0}", container.Resolve<IInterfaceA>().GetHashCode());
            Debug.LogFormat("IInterfaceB:{0}", container.Resolve<IInterfaceB>().GetHashCode());
        }
        interface IInterfaceA { }
        interface IInterfaceB { }
        class ClassC : IInterfaceA, IInterfaceB { }
    }
自动绑定接口和自身BindInterfacesAndSelfTo<ClassC>()
将目标类型ClassC所有的接口和自身作为约定类型与ClassC进行绑定。(不能为抽象类)
测试代码:
    public class BindInterfacesAndSelfToExample : MonoBehaviour
    {
        private void Start()
        {
            var container = new DiContainer();
            //自动将ClassD所有接口和自身与ClassD进行绑定
            container.BindInterfacesAndSelfTo<ClassD>()
                .AsSingle();
            Debug.LogFormat("IInterfaceA:{0}", container.Resolve<IInterfaceA>().GetHashCode());
            Debug.LogFormat("IInterfaceB:{0}", container.Resolve<IInterfaceB>().GetHashCode());
            Debug.LogFormat("ClassD:{0}", container.Resolve<ClassD>().GetHashCode());
        }
        interface IInterfaceA { }
        interface IInterfaceB { }
        class ClassD : IInterfaceA, IInterfaceB { }
    }
(f)绑定实例
Bind<XXX>().FromInstance(new XXX())绑定实例BindInstance(new XXX())绑定实例(简便方法)BindInstances(new XXX(),new YYY(),new ZZZ())一次性绑定多个实例
将实例与约定类型绑定,之后每次解析约定类型时均返回同一实例。
测试代码:
    public class BindInstanceExample : MonoBehaviour
    {
        private void Start()
        {
            var container = new DiContainer();
            container.Bind<A>().FromInstance(new A());
            container.BindInstance(new B());
            container.BindInstances(new C(), new D(), new E());
            Debug.LogFormat("A:{0}", container.Resolve<A>().GetHashCode());
            Debug.LogFormat("A:{0}", container.Resolve<A>().GetHashCode());
            Debug.LogFormat("B:{0}", container.Resolve<B>().GetHashCode());
            Debug.LogFormat("B:{0}", container.Resolve<B>().GetHashCode());
            Debug.LogFormat("C:{0}", container.Resolve<C>().GetHashCode());
            Debug.LogFormat("D:{0}", container.Resolve<D>().GetHashCode());
            Debug.LogFormat("E:{0}", container.Resolve<E>().GetHashCode());
        }
        class A { }
        class B { }
        class C { }
        class D { }
        class E { }
    }
运行结果:

(g)绑定原生类型
可以绑定CSharp自带的原生类型。
测试代码:
public class BindPrimitiveTypeExample : MonoBehaviour
{
private void Start()
{
var container = new DiContainer();
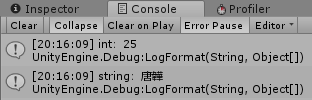
container.Bind<int>().FromInstance(25);
container.BindInstance("唐韡");
Debug.LogFormat("int:{0}", container.Resolve<int>());
Debug.LogFormat("string:{0}", container.Resolve<string>());
}
}
运行结果:
(h)BindFromMethod从方法中绑定(实例:方法的返回值)
可以从方法中绑定实例=>给绑定实例的过程增加逻辑
测试代码:
public class BindFromMethodExample : MonoBehaviour
{
private void Start()
{
var container = new DiContainer();
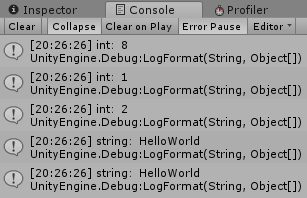
container.Bind<int>().FromMethod(GetRandomNumber);
container.Bind<string>().FromMethod(() => "HelloWorld");
Debug.LogFormat("int:{0}", container.Resolve<int>());
Debug.LogFormat("int:{0}", container.Resolve<int>());
Debug.LogFormat("int:{0}", container.Resolve<int>());
Debug.LogFormat("string:{0}", container.Resolve<string>());
Debug.LogFormat("string:{0}", container.Resolve<string>());
}
int GetRandomNumber()
{
return Random.Range(1, 10);
}
}
运行结果:
(I)Bind<XXX>().FromFactory<XXXXX>()绑定简单工厂
从工厂中绑定实例=>工厂生产的实例与约定类型进行绑定
测试代码:
public class BindFromFactoryExample : MonoBehaviour
{
private void Start()
{
var container = new DiContainer();
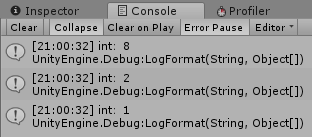
container.Bind<int>().FromFactory<RandomNumber>();
Debug.LogFormat("int:{0}", container.Resolve<int>());
Debug.LogFormat("int:{0}", container.Resolve<int>());
Debug.LogFormat("int:{0}", container.Resolve<int>());
}
class RandomNumber : IFactory<int>
{
public int Create()
{
return Random.Range(1, 10);
}
}
}
运行结果:
3.安装器Installer
安装器的作用是使一组绑定操作可以复用。
- 一般的Installer
- MonoInstaller:需要SceneContext
- ScriptableObjectInstaller:需要SceneContext,常用于绑定配置文件
(1)一般的Installer
测试代码:
    public class InstallerExample : MonoBehaviour
    {
        private void Start()
        {
            var container = new DiContainer();
            //安装器在安装的过程中会执行InstallBindings方法
            //进行一系列绑定操作(本例中进行了两次绑定操作)
            //使用安装器进行绑定,可以将一组绑定操作复用。
            SubSystemInstaller.Install(container);//为Installer提供Container
            container.Resolve<MyTestClassA>().Test();
            container.Resolve<MyTestClassB>().Test();
        }
        class SubSystemInstaller : Installer<SubSystemInstaller>
        {
            public override void InstallBindings()
            {
                Container.Bind<MyTestClassA>()
                    .AsSingle();
                Container.Bind<MyTestClassB>()
                    .AsSingle();
            }
        }
    }
    public class MyTestClassA
    {
        public void Test()
        {
            Debug.Log(GetType());
        }
    }
    public class MyTestClassB
    {
        public void Test()
        {
            Debug.Log(GetType());
        }
    }
运行结果:
(2)MonoInstaller
-
Step1:在Hierarchy中创建SceneContext(环境上下文,类似于一个组装器)
-
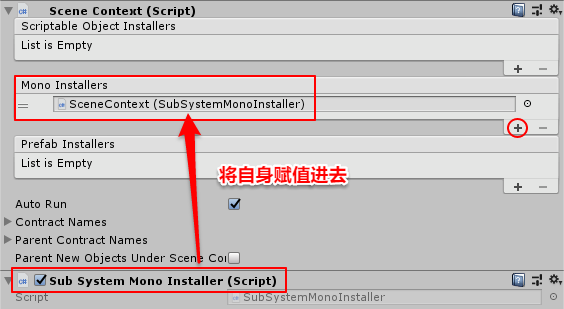
Step2:在Project中通过”鼠标右键–Create–Zenject–Mono Installer“创建MonoInstaller脚本,取名为SubSystemMonoInstaller将脚本挂载到SceneContext上,并给SceneContext组件添加Mono Installers,最后将自身赋值进去,如下图:
-
Step3:编辑SubSystemMonoInstaller脚本:(在其中可以进行一系列绑定操作)
public class SubSystemMonoInstaller : MonoInstaller { public override void InstallBindings() { Container.Bind<MyTestClassA>() .AsSingle(); Container.Bind<MyTestClassB>() .AsSingle(); } } -
Step4:创建空物体,取名为MonoInstallerExample,并创建同名脚本,将脚本挂载在该物体上,然后编辑脚本:
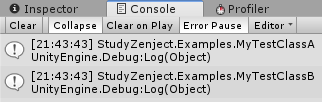
public class MonoInstallerExample : MonoBehaviour { [Inject] private MyTestClassA mMyTestClassA; [Inject] private MyTestClassB mMyTestClassB; private void Start() { mMyTestClassA.Test(); mMyTestClassB.Test(); } }MonoInstaller会自动完成绑定,然后在测试脚本中,会通过Field Injection成员变量(域)注入实例。
运行结果:
(3)Scriptable Object Installer
一般用于绑定配置文件,使用流程如下:
-
Step1:同上创建SceneContext(环境上下文)
-
Step2:在Project中通过”鼠标右键–Create–Zenject–Scriptable Object Installer“创建脚本,并命名为ConfigInstaller,编辑脚本:
PlayerSetting为玩家配置的类,需要打上序列化标签。可以通过配置加载相关资源。[CreateAssetMenu(fileName = "ConfigInstaller", menuName = "Installers/ConfigInstaller")] public class ConfigInstaller : ScriptableObjectInstaller<ConfigInstaller> { public PlayerSetting Setting; public override void InstallBindings() { //Container.Bind<PlayerSetting>().FromInstance(Setting); Container.BindInstance(Setting); } [System.Serializable] public class PlayerSetting { public int ID = 1001; public GameObject Prefab; public Sprite Icon; } } -
Step3:在Project中通过”鼠标右键–Create–Installers–ConfigInstaller“创建配置文件。
-
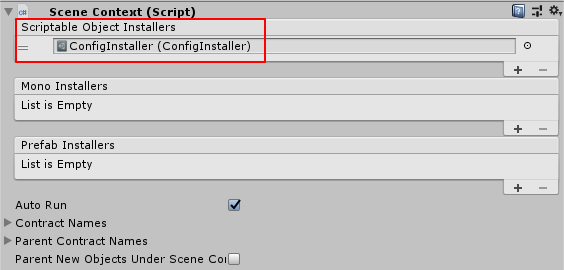
Step4:将ConfigInstaller配置文件拖拽到SceneContext上,如下图:
-
Step5:创建空物体,取名为ScriptableObjectInstallerExample,并创建同名脚本,将脚本挂载在该物体上,然后编辑脚本:
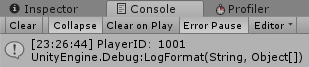
public class ScriptableObjectInstallerExample : MonoBehaviour { [Inject] private ConfigInstaller.PlayerSetting mPlayerSetting; private void Start() { Debug.LogFormat("PlayerID:{0}", mPlayerSetting.ID); } }ConfigInstaller会自动完成绑定,然后在测试脚本中,会通过Field Injection成员变量(域)注入实例。
运行结果:
4.上下文Context
- Context负责管理/组装Installer和Container
- Installer进行绑定操作需要Container,这个Container由Context提供。
- Context有四种:
- Scene Context:场景上下文
- GameObject Context:
- Decorator Context:装饰器上下文
- Project Context:
(1)Scene Context场景上下文
- 每个场景的入口
- 第一个执行(如果隐藏则不执行,直到激活时才执行)
- 初始化场景中所有的依赖(注入所有依赖,即使被隐藏也会被注入依赖)
基础的使用方法同MonoInstaller。
5.动态注入
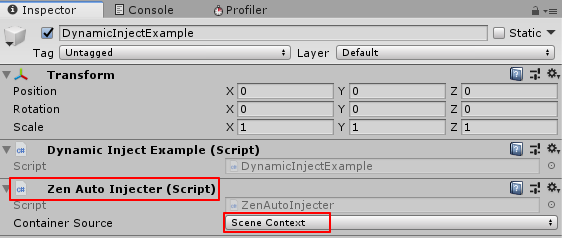
Scene Context会在场景运行第一时间对场景内的物体进行一次依赖注入,当运行的时候,如果有新的需要注入的物体被加载出来的时候需要进行动态注入。
动态注入:需要在被注入Prefab上添加脚本Zen Auto Injecter
注意:需要动态注入的对象初始运行时不能出现在场景中,否则会报重复注入的错误。
6.动态绑定
使用方法:
-
给需要动态绑定的对象添加Zenject Binding脚本,并给其Components赋值,然后设置Bind Type,如下图:
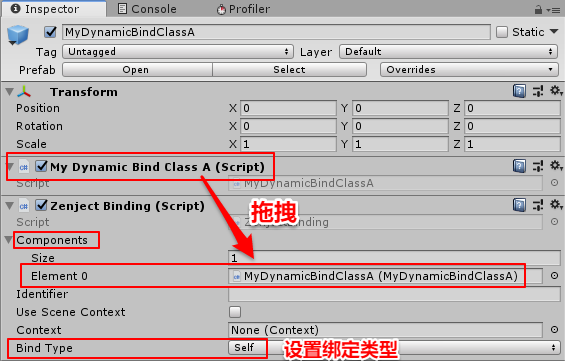
之后此对象不需要Installer也会自动完成绑定。(场景中存在Scene Context)
三、官方示例与知识点补充
1.将Installer注入到Installer中
-
Step1:创建两个MonoInstaller,分别命名为FirstMonoInstaller和SecondMonoInstaller。
-
Step2:在FirstMonoInstaller中绑定,在SecondMonoInstaller中注入:
    public class FirstMonoInstaller : MonoInstaller
    {
        public override void InstallBindings()
        {
            Container.BindInstance(10);
        }
    }
    public class SecondMonoInstaller : MonoInstaller
    {
        [Inject]
        private int mCount { get; set; }
        public override void InstallBindings()
        {
            Debug.Log("InstallBindings:" + mCount);
        }
        public override void Start()
        {
            base.Start();
            Debug.Log("StartFunction:" + mCount);
        }
    }
-
Step3:在场景中创建SceneContext,并为MonoInstallers按顺序赋值:
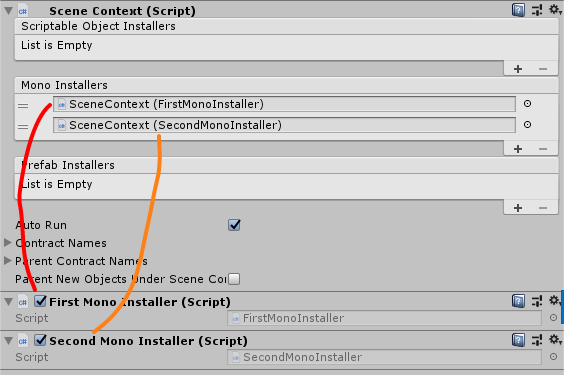
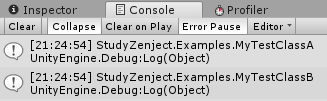
运行结果:FirstMonoInstaller中绑定的实例被成功注入到SecondMonoInstaller中
2.绑定Zenjeck中的Interface(IInitializable,IFixedTickable,ITickable,ILateTickable,ILateDisposable)
- IInitializable:初始化执行类似于Start
- IFixedTickable:类似于FixedUpdate,先于ITickable执行
- ITickable:类似于Update,先于ILateTickable执行
- ILateTickable:类似于LateUpdate
- ILateDisposable:
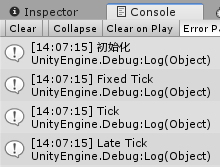
    public class MonoInstallerForExample26 : MonoInstaller
    {
        public override void InstallBindings()
        {
            Container.BindInterfacesAndSelfTo<Example26ClassA>()
                .AsSingle();
        }
    }
    public class Example26ClassA : IInitializable,
        ITickable,
        IFixedTickable,
        ILateTickable,
        ILateDisposable
    {
        public void Initialize()
        {
            Debug.Log("初始化");
        }
        public void FixedTick()
        {
            Debug.Log("Fixed Tick");
        }
        public void Tick()
        {
            Debug.Log("Tick");
        }
        public void LateTick()
        {
            Debug.Log("Late Tick");
        }
        public void LateDispose()
        {
            Debug.Log("Late Dispose");
        }
    }
运行结果:
注意:
- 1.若同一接口作为约定类型与多个Class进行绑定,此时使用
Container.Resolve<接口>()时会出错。 - 2.绑定接口一般使用
Container.BindInterfacesAndSelfTo<类名>()
3.非MonoBehaviour下的构造函数注入
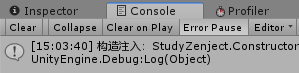
一般继承自MonoBehaviour的脚本没有构造函数,所以构造函数注入在此处本质上属于方法注入;但在非继承自MonoBehaviour的Class中存在构造函数注入。
注意:
- 1.在Resolve解析之前需要绑定好构造函数所需要的所有参数
- 2.如果不使用SceneContext组装则无法使用Zenject的特殊接口(IInitializable,IFixedTickable,ITickable,ILateTickable,ILateDisposable)
代码:
    public class ConstructorInjectNonMonoClassExample : MonoBehaviour
    {
        private void Start()
        {
            DiContainer container = new DiContainer();
            container.BindInstance(new Example27ClassA());
            container.BindInterfacesAndSelfTo<Example27ClassB>()
                .AsTransient();
            container.Resolve<Example27ClassB>();
        }

        public class Example27ClassA { }
        public class Example27ClassB : IInitializable
        {
            public Example27ClassB(Example27ClassA classA)
            {
                Debug.Log("构造注入:" + classA.GetType());
            }
            /// <summary>
            /// 如果不使用SceneContext组装则无法使用Zenject的特殊接口
            /// </summary>
            public void Initialize()
            {
                Debug.Log("使用Zenject特殊接口 IInitializable 进行初始化");
            }
        }
    }
运行结果:
4.PlaceholderFactory的基本使用
PlaceholderFactory使用步骤:
-
Step1:绑定约定类型和工厂:
container.BindFactory<约定类型, 工厂>() -
Step2:解析工厂、并通过工厂创建约定类型对象实例:
约定类型 classA = container.Resolve<工厂>().Create()约定类型实例会执行一次注入操作
IFactory使用步骤:
-
Step1:绑定约定类型和工厂:
container.Bind<约定类型>().FromFactory<工厂>() -
Step2:解析约定类型以创建约定类型实例:
约定类型 classA2 = container.Resolve<约定类型>()此时约定类型实例并未执行注入操作
-
Step3:约定类型执行注入操作:
container.Inject(约定类型实例)
对比PlaceholderFactory和IFactory:PlaceholderFactory相对于IFactory多了注入的过程
public class PlaceholderFactoryExample : MonoBehaviour
{
private void Start()
{
DiContainer container = new DiContainer();
//PlaceholderFactory相对于IFactory多了注入的过程
container.BindInstance(10);
container.BindFactory<Example28ClassA, Example28Factory>();
Example28ClassA classA = container.Resolve<Example28Factory>().Create();
Debug.Log("PlaceholderFactory:" + classA.Count);
container.Bind<Example28ClassA>()
.FromFactory<Example28IFactory>();
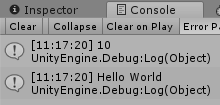
Example28ClassA classA2 = container.Resolve<Example28ClassA>();
Debug.Log("IFactory,执行注入操作之前:" + classA2.Count);
container.Inject(classA2);
Debug.Log("IFactory,执行注入操作之后:" + classA2.Count);
}
}
public class Example28ClassA
{
[Inject]
public int Count;
}
/*
* PlaceholderFactory相对于IFactory多了注入的过程
*/
public class Example28Factory : PlaceholderFactory<Example28ClassA>
{
}
public class Example28IFactory : IFactory<Example28ClassA>
{
public Example28ClassA Create()
{
return new Example28ClassA();
}
}
运行结果:
5.PlaceholderFactory链式功能基本使用
- 1.通过Prefab创建新对象:
.FromComponentInNewPrefab(Prefab参数) - 2.给创建的新对象命名:
.WithGameObjectName("对象名称") - 3.为创建的对象设置统一父物体,便于场景管理:
.UnderTransformGroup("父物体名称")
代码:
    public class Person : MonoBehaviour
    {

        public class Factory : PlaceholderFactory<Person>
        {
        }
    }
public class PlaceholderFactoryShortCutExample : MonoBehaviour
{
public GameObject PersonPrefab;
private void Start()
{
DiContainer container = new DiContainer();
//将约定类型与工厂绑定
container.BindFactory<Person, Person.Factory>()
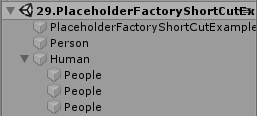
.FromComponentInNewPrefab(PersonPrefab)
.WithGameObjectName("People")
.UnderTransformGroup("Human");
//解析工厂
Person.Factory factory = container.Resolve<Person.Factory>();
//使用工厂实例创建对象
factory.Create();
factory.Create();
factory.Create();
}
}
运行结果:
6.条件绑定
当对某个约定类型执行注入操作的时候进行绑定:Container.BindInstance(实例).WhenInjectedInto<约定类型>()
需要和SceneContext配合使用。
代码:
    public class ConditionBindingExample : MonoBehaviour
    {
        [Inject] public int Number;
        [Inject] public string Content;
        private void Start()
        {
            Debug.Log(Number);
            Debug.Log(Content);
        }
    }
    public class ConditionBingingInstaller : MonoInstaller
    {
        public override void InstallBindings()
        {
            Container.BindInstance(10);
            //条件绑定
            Container.BindInstance("Hello World")
                .WhenInjectedInto<ConditionBindingExample>();
        }
    }
运行结果:
7.Zenject自带的消息系统Signal基本使用——BindSignal<>()
注意:这是一个旧的消息系统,必须结合SceneContext使用。
使用步骤:
-
Step1:安装:
SignalBusInstaller.Install(Container) -
Step2:声明:
Container.DeclareSignal<SignalA>() -
Step3:绑定:
Container.BindSignal<SignalA>() .ToMethod(() => { //发送消息时执行 Debug.Log("SignalA Fired"); }); -
Step4:解析SignalBus:
SignalBus signalBus = Container.Resolve<SignalBus>() -
Step5:发送消息:
signalBus.Fire(new SignalA())发送消息时会走绑定内部自定义的逻辑。
代码:
    public class SignalMonoInstaller : MonoInstaller
    {
        public override void InstallBindings()
        {
            SignalBusInstaller.Install(Container);//安装
            Container.DeclareSignal<SignalA>();//声明
            Container.BindSignal<SignalA>()
                .ToMethod(() =>
                {
                    //发送消息时执行
                    Debug.Log("SignalA Fired");
                });
        }
        public class SignalA { }
        private void Update()
        {
            if (Input.GetMouseButtonDown(0))
            {
                SignalBus signalBus = Container.Resolve<SignalBus>();
                signalBus.Fire(new SignalA());
            }
        }
    }
运行结果:每次点击鼠标左键都会发送一次消息
8.Zenject自带的消息系统SignalBus基本使用——Subscribe<>()
注意:这是新的消息系统,不再需要Container.BindSignal<>(),而是改为订阅:signalBus.Subscribe<>();同时不再依赖于SceneContext。
使用步骤:
-
Step1:创建容器:
mContainer = new DiContainer() -
Step2:安装:
SignalBusInstaller.Install(Container) -
Step3:声明:
Container.DeclareSignal<SignalA>() -
Step4:解析SignalBus:
SignalBus signalBus = mContainer.Resolve<SignalBus>() -
Step5:订阅:
signalBus.Subscribe<SignalB>(内部可自定义逻辑,可传递消息对象) -
Step6:发送消息:
signalBus.Fire(new SignalA())发送消息时会走订阅内部自定义的逻辑,同
BindSignal中ToMethod()一样。
代码:
public class SignalBusExample : MonoBehaviour
{
private DiContainer mContainer;
private void Start()
{
mContainer = new DiContainer();
SignalBusInstaller.Install(mContainer);
mContainer.DeclareSignal<SignalB>();
SignalBus signalBus = mContainer.Resolve<SignalBus>();
//订阅消息:可以将消息对象作为参数传递
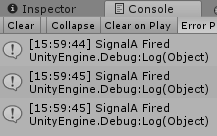
signalBus.Subscribe<SignalB>(value =>
{
value.Age = 25;
Debug.Log("SignalB Fired");
});
}
public class SignalB
{
public int Age = 1;
}
private void Update()
{
if (Input.GetMouseButtonDown(0))
{
SignalBus signalBus = mContainer.Resolve<SignalBus>();
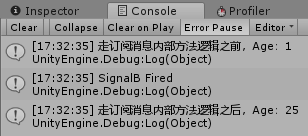
SignalB signalB = new SignalB();
Debug.Log("走订阅消息内部方法逻辑之前,Age:" + signalB.Age);
signalBus.Fire(signalB);
Debug.Log("走订阅消息内部方法逻辑之后,Age:" + signalB.Age);
}
}
}
运行结果:
9.绑定的时候传参
使用PlaceholderFactory生产对象,并为对象生成传参。
    public class ArgumentsExample : MonoBehaviour
    {
        public class ClassA
        {
            public ClassA(int a, int b)
            {
                Debug.Log(a + "\n" + b);
            }
            public class Factory : PlaceholderFactory<int, int, ClassA>
            {
            }
        }
        private void Start()
        {
            var container = new DiContainer();
            container.BindFactory<int, int, ClassA, ClassA.Factory>();
            container.Resolve<ClassA.Factory>()
                .Create(1, 2);
            container.Resolve<ClassA.Factory>()
                .Create(3, 4);
        }
    }
10.GameObjectContext的使用
可以挂载在场景中的GameObject上,为该物体下的Installer绑定提供上下文。场景中必须有SceneContext。
Installer(MonoInstaller):此Installer必须和GameContext在同一物体上或为父子层级关系。
    public class GameObjectInstaller : MonoInstaller
    {
        public override void InstallBindings()
        {
            Container.Bind<TestForExample>()
                .AsSingle();
        }
    }
    public class GameObjectContextExample : MonoBehaviour
    {
        [Inject] private TestForExample mTestForExample;
        private void Start()
        {
            Debug.Log("TestForExample:" + mTestForExample.GetHashCode());
        }
    }
    public class TestForExample
    {
    }
四、最佳实践
- 跨模块的两个对象交互,通过模块类进行交互。=>进一步:通过观察者模式,发送消息
- 同模块两个对象交互
1.响应式属性——将Model与View绑定
    public class Property<T>
    {
        private T mValue;
        public T Value
        {
            get => mValue;
            set
            {
                if (!mValue.Equals(value))
                {
                    mValue = value;
                    OnDataChangedEvent?.Invoke(value);
                }
            }
        }
        public event Action<T> OnDataChangedEvent;
    }
在ViewModel中注册OnDataChangedEvent事件即可完成View与Model的绑定。
五、自定义简单DI容器
六、依赖注入理论
- 依赖倒置:软件设计原则(DIP:Dependence Inversion Principle–依赖倒置)
- 控制反转:设计策略、设计模式(IOC:Invertion Of Control–控制反转)
- 依赖注入:解决方案——使用DI容器/IOC容器(DI:Dependency Injection–依赖注入)
DI容器/IOC容器:
- 动态创建、注入依赖对象
- 管理对象生命周期
-
映射依赖关系
- DI:Dependency Injection–依赖注入
- IOC:Invertion Of Control–控制反转